
Welcome back to the “Chronicles of a Home Data Center“! In our “Day -1” post, we laid the essential groundwork – wrestling with the ‘why,’ defining goals, facing the budget, acknowledging potential pitfalls (and the critical ‘Wife Acceptance Factor’ – hopefully, your blinking lights are less controversial than mine!). We covered the crucial preparation needed before diving into the technical deep end.
Now, if that initial exploration got you thinking, “Alright, I understand the prep work, I’m ready to actually figure out how to start planning the technical side of my own home data center,” then you’ve arrived at the perfect next step: Day 0.
This post marks the transition from high-level goals and constraints to crafting the initial blueprint. We’re rolling up our sleeves (metaphorically, for now!) to strategically plan the very first technical iteration. Specifically, we’ll focus on how to approach the journey towards technologies like Kubernetes by designing a Small-Scale Proof of Concept (POC). We’ll explore how using accessible hardware – whether it’s a Single-Board Computer (SBC), an old laptop, or a dusty desktop – can be the smartest way to kickstart your home data center adventure.
Consider this your guide to translating ambition into an actionable Day 0 strategy. If you’re ready to map out the first phase of your home data center build, let’s dive into the blueprint!
Table of Contents
Defining the Day 0 Blueprint: Strategy Before Setup
So, we covered the “why” and the “what constraints” back in Day -1. We’ve got our high-level goals, maybe a budget (or at least an understanding of the WAF limits!), and a sense of the challenges ahead. But ambition and constraints alone don’t build a home data center. Now, on Day 0, we forge the Blueprint.
What is this “Day 0 Blueprint” in our Chronicle?
Think of it less like a detailed architectural schematic (we’re not building a skyscraper… yet!) and more like a strategic plan for the very first, tangible step. It’s about consciously deciding what we will build first, why we’re building it that way, and how it fits into the bigger picture (our eventual Kubernetes dreams).
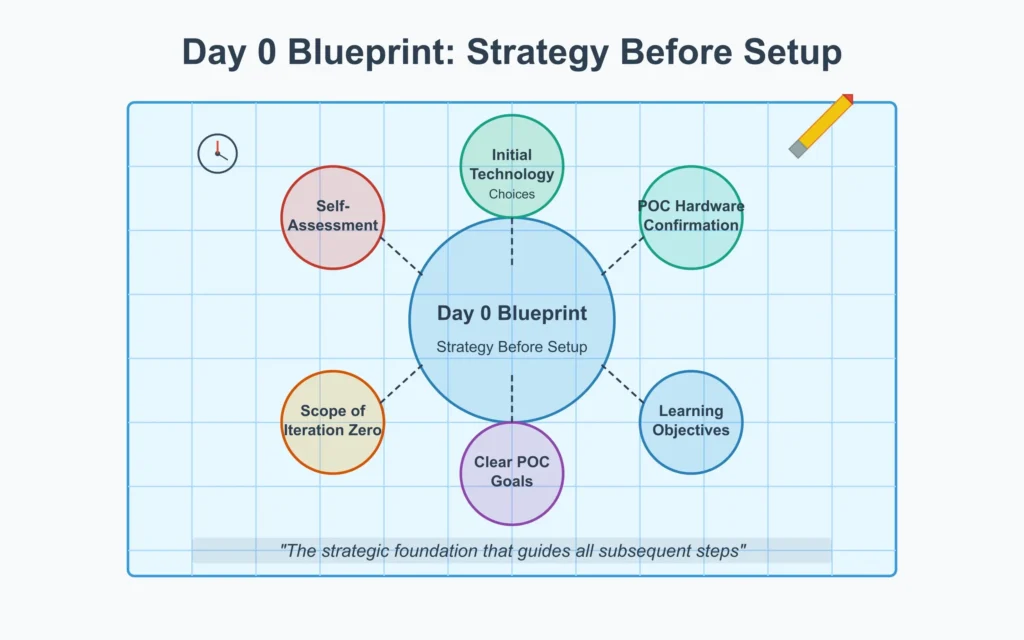
Crucially, Day 0 is still firmly in the planning phase. We’re resisting the urge to plug things in and start installing software blindly. Instead, our Blueprint involves defining:
Self-Assessment: Before diving into technical choices, it’s crucial to honestly assess our current technical skills. If our goal is a Kubernetes server, but we haven’t mastered Docker yet, Kubernetes will be a frustrating uphill battle. We must start with a clear understanding of our current capabilities and a plan to bridge any skill gaps.
Scope of Iteration Zero: What is the absolute minimum we want to achieve in our first technical phase (our Proof of Concept)? Keep it small, manageable, and focused.
Initial Technology Choices (for the POC): Based on our Day -1 research and self-assessment, what OS, container tech (likely Docker to start) make sense for this first step? Reflecting on the “olden days” of manually installing and configuring entire stacks like Apache Tomcat for the backend and Nginx for the frontend, we can appreciate the massive leap forward containerization represents. Docker allows us to package our applications and their dependencies neatly, eliminating much of the complexity and reducing the chance of compatibility issues.
Clear POC Goals: What specific things must our Small-Scale POC accomplish? (e.g., “Successfully run 3 different containerized web apps,” “Establish basic monitoring,” ). These must be measurable.
POC Hardware Confirmation: Confirming that the chosen low-spec hardware (our SBC, old laptop, or desktop) is indeed suitable for the defined scope of this initial POC. Leveraging existing, often underutilized hardware like Single-Board Computers (SBCs), older laptops, or even repurposed desktops offers several advantages:
- Cost-Effectiveness: Reusing existing hardware minimizes upfront costs, allowing us to invest in other components (like storage) as the home data center grows.
- Learning Focus: Starting with limited resources encourages efficient resource utilization and a focus on learning and optimization, valuable skills for any infrastructure project.
- Learning Objectives: What specific skills or knowledge do we aim to gain during this first build phase?
Why “Strategy Before Setup”?
Taking the time to define this Day 0 Blueprint, even for a small starting step, is vital. It prevents us from chasing technical squirrels down rabbit holes, ensures our first effort directly contributes to our long-term Kubernetes goal, helps manage costs and learning curves, and sets us up for an early, motivating win. It’s the difference between a structured experiment and just messing around (though there’s a time for that too!).
With the idea of the Blueprint defined, the next step is to flesh out the core of it: defining the specifics and benefits of starting with that Small-Scale Proof of Concept.
Embracing the Small-Scale POC: Your First Iteration
With our Day 0 Blueprint taking shape, we arrive at its heart: the Small-Scale Proof of Concept (POC). This isn’t just a buzzword; it’s the planned output of our Day 0 efforts, our carefully considered “Iteration Zero.” It’s the first concrete step we’ll take (in a future “Day 1” post!) on our journey from zero to a functioning home data center.
Why Embrace Starting Small?
It might feel counterintuitive when dreaming of powerful Kubernetes clusters, but deliberately starting small with a POC on modest hardware (that SBC, old laptop, or desktop) is a strategic advantage:
- Manageable Learning Curve: Technology like Docker, let alone Kubernetes, has depth. Trying to learn everything at once is a recipe for burnout. A small POC allows us to focus on mastering foundational skills first – like basic Linux commands, Docker fundamentals, or simple networking – before tackling more complex orchestrators. Remember that self-assessment? The POC is where we plan to bridge those initial skill gaps methodically.
- Low Risk, Low Cost: Let’s be honest, mistakes will happen. When you’re experimenting on hardware that was free or inexpensive, those mistakes are valuable learning experiences, not costly budget blowouts. You can test configurations, break things, and reformat without worrying about bricking expensive gear. This de-risks the entire project significantly.
- Faster Feedback & Motivation: Getting something – anything – running quickly provides a powerful motivational boost. A small-scale POC delivers this tangible success much faster than attempting a large, complex setup from scratch. It allows you to validate your initial assumptions and get immediate feedback on whether your approach is working.
- Forced Focus & Prioritization: Limited resources (CPU, RAM, even your time!) force you to prioritize ruthlessly. What is truly essential for this first iteration? This focus prevents scope creep and ensures you concentrate on the most critical initial steps and learning objectives.
A Note for the Experienced (and Why the POC Still Matters)
Now, some of you reading this might be like me – perhaps you’ve architected and deployed Kubernetes clusters for multiple customers or managed them in demanding production environments. You might look at meticulously planning a simple Docker or K3s POC on an old laptop and think, “I can skip this, I know K8s!” And technically, you might possess the core skills.
However, even for seasoned professionals, the home lab environment presents unique challenges – hardware quirks you wouldn’t tolerate professionally, consumer-grade networking, strict power/noise limits (hello, WAF!), and often tighter budgets. A quick POC even in this context can save headaches validating assumptions on this specific gear.
But more importantly, drawing from my experience mentoring many individuals setting up their first home data centers right here in Hanoi, if you do not have prior hands-on experience building Kubernetes infrastructure from the ground up (especially outside of managed cloud platforms), then trust me: this planned, small-scale POC step is absolutely essential. Diving headfirst into a full K8s deployment without mastering container fundamentals and understanding the nuances of your chosen hardware and network is the surest path to overwhelming frustration and project abandonment. Consider this Day 0 POC planning your non-negotiable foundation for success.
Defining the Scope of Your POC Plan
So, with that perspective in mind, what should your Day 0 plan for the POC include? Based on your goals (Day -1) and blueprint (earlier today!), you need to define:
The Core Problem/Goal: What specific, small thing will this POC achieve? It should be a subset of your larger goals.
- Struggling to define a specific goal? If, after Day -1, you’re still unsure what you want your home data center to do initially, don’t let that stall your Day 0 planning! A fantastic and highly recommended starting project, especially if you’re new to this, is planning to host your own WordPress site using Docker.
Why WordPress as a default POC goal?
- It’s a practical, real-world application used everywhere.
- Setting it up via Docker typically involves learning to manage the interaction between the WordPress application container and its required database container (e.g., MySQL or MariaDB).
- It forces you to learn about Docker networking or, more likely, Docker Compose.
- It requires handling persistent data for your site content and database.
- It provides a tangible, visible result (a working website!) which is great for motivation.
- Countless tutorials and community support are available online.
Consider planning for a WordPress deployment a solid default POC goal if you’re looking for a meaningful, educational, and useful first step into containerization and self-hosting.
Other Examples (if you do have a specific goal): “Host my personal static website using Docker,” “Set up a reliable Pi-hole container for ad-blocking,” “Learn basic Docker Compose by deploying 2 linked services,”
Key Technologies to Validate/Learn: What specific software or techniques are you focusing on in this iteration? Examples: “Docker command-line basics,” “Writing a simple Dockerfile,” “Understanding Docker networking (bridge mode),” “Assigning a static local IP.” (Note: If choosing WordPress, this would likely include “Docker Compose basics” and “Managing persistent volumes”). But don’t worry if everything does not make sense to you now as you can follow along to my Day 1 to see the POC together
Measurable Success Criteria: How will you know when this planned POC iteration is “done” and successful? Be specific! Examples: “Website container is accessible via IP address on my local network,” “Pi-hole successfully blocks ads on devices configured to use it,” “Both linked services start correctly with docker-compose up,” (For WordPress: “Default WordPress installation page loads,” “Can log in to WordPress admin dashboard,” “Data persists after restarting containers”). Again don’t worry if everything does not make sense to you now as you can follow along to my Day 1 to see the POC together
Hardware Reality Check: Revisit your chosen SBC/laptop/desktop. Does it realistically meet the minimum requirements for the specific technologies you just listed? (e.g., K3s generally needs more RAM than just running simple Docker containers; running WordPress + Database might need slightly more RAM than a single static site container). Adjust your POC scope if needed based on hardware limitations.
Mindset is Key: Iteration, Not Perfection
Crucially, plan your POC as a learning exercise, not a final, polished product. It’s Iteration Zero. It might be messy, temporary, and imperfect. That’s okay. The primary goals are to learn, validate core concepts, build foundational skills, and gain the confidence and momentum to move on to Iteration One.
By meticulously planning this Small-Scale POC today, on Day 0, we pave the way for a smoother, more productive, and ultimately more successful “Day 1” build experience when we finally start putting hands on hardware.
Hardware Deep Dive: Choosing and Equipping Your POC Platform (SBC, Laptop, Desktop, or Mini PC)
We’ve established that our initial Proof of Concept (POC) will run on modest, accessible hardware. Before we compare the options, I’ll admit my personal bias: I love leveraging Single-Board Computers or repurposing old laptops and desktops for these projects. There’s immense satisfaction in giving old hardware new life, and the cost-effectiveness is hard to beat, making the entry barrier incredibly low. That said, this approach isn’t for everyone.
If budget allows, or if you simply prefer the convenience and potentially higher performance of new hardware, investing in a capable Mini PC or even entry-level server gear is absolutely a valid path. For the purposes of this initial Day 0 planning and our Small-Scale POC, however, we’ll lean into the low-cost philosophy, as it’s often the most accessible and educational starting point.
To give you a concrete idea of applying this philosophy, my own current home data center utilizes a mix: an old Lenovo ThinkPad T480 laptop (upgraded to 32GB RAM with a 500GB SSD, running an 8-thread Intel CPU) acting as a workhorse, alongside a powerful Orange Pi 5 Plus SBC (boasting an 8-core ARM CPU, 32GB RAM, and 256GB onboard eMMC storage). This combination showcases how both repurposed x86 hardware and capable modern ARM SBCs can be effectively leveraged.
Now let’s look at the practical differences between the common low-cost options:
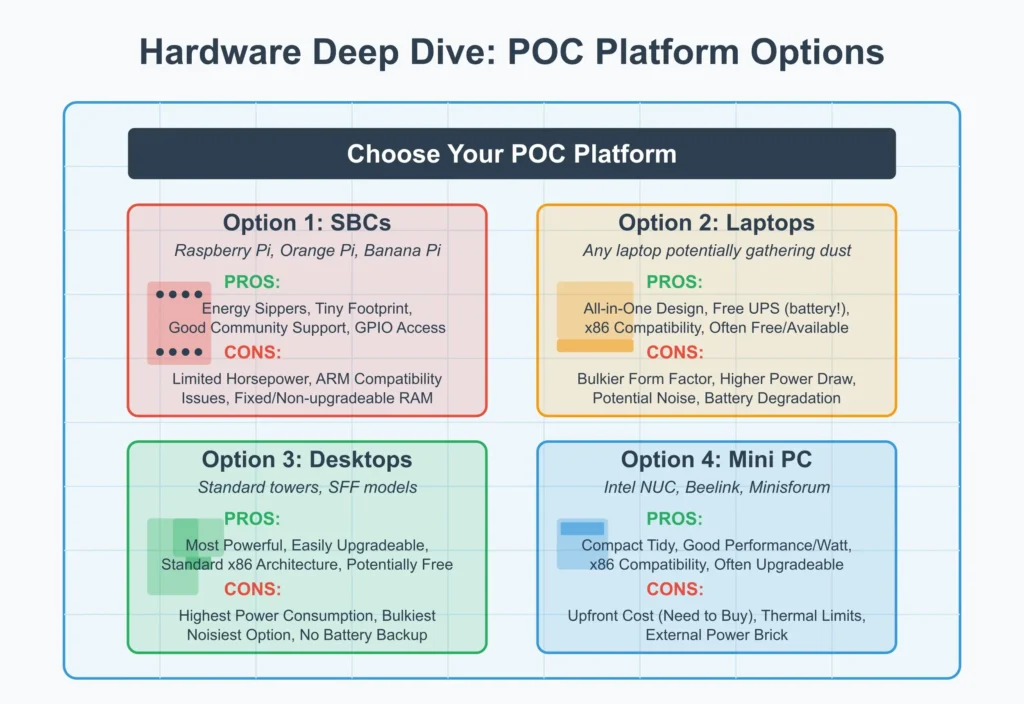
Option 1: Single-Board Computers (SBCs)
- Examples: Raspberry Pi (various models), Orange Pi, Banana Pi, etc.
- Pros: Energy Sippers; Tiny Footprint; Good Community (esp. RPi); GPIO Access.
- Cons: Limited Horsepower (check specs!); ARM Compatibility (occasional issues); RAM is usually fixed/non-upgradeable.
Storage Considerations (CRITICAL!):
- MicroSD Cards: While cheap and used for initial setup, running a server workload 24/7 from a MicroSD card is strongly discouraged for anything beyond temporary testing. They are not designed for constant read/writes and are prone to corruption and failure under server load.
- eMMC: Some SBC models come with onboard eMMC storage. This is generally more reliable than MicroSD for running the OS and light workloads. Check availability of specific models with eMMC.
- SSD Boot (Highly Recommended): The best option for reliability and performance is to use an SBC model that supports booting and running its OS from an external SSD (via USB adapter) or, ideally, an NVMe SSD if the board supports it. This dramatically improves speed and longevity. Factor the cost of the SSD and any necessary adapter into your plan.
- Availability/Cost: SBCs with eMMC or NVMe support might be less common or pricier than basic MicroSD models. Check online platforms and specialist suppliers for availability and pricing.
POC Suitability: With SSD/eMMC, great for Docker, web servers, network tools. K3s may run on higher-spec models (with sufficient RAM) but check resource usage.
There are many excellent videos on YouTube exploring the setup and capabilities of powerful SBCs like the Orange Pi 5 Plus for homelab use. Searching for reviews or specific setup guides for the model you’re considering is highly recommended if you want a visual deep dive. Video Link to know more about sbc is below
Option 2: Old Laptops
- Examples: Any laptop potentially gathering dust.
- Pros: All-in-One; Free UPS (battery!); x86 Compatibility; Often Free; Decent Power; Often allows RAM/SSD upgrades.
- Cons: Bulkier; Higher Power Draw (than SBC); Potential Noise; Battery Degradation.
- Leveraging: Run headless; battery backup is useful. Easy to swap HDD for a cheap SATA or NVME SSD for huge performance boost.
- POC Suitability: Excellent for Docker, multi-container apps (WordPress), often capable for single-node K3s (aim for 8GB+ RAM, SSD strongly recommended).
- Most readers are likely familiar with the basic form factor and operation of laptops. Specific guides for tasks like installing Linux or upgrading RAM/SSD on various models are widely available online via search if you need them, so I won’t link general introductory videos here.
Option 3: Old Desktops
- Examples: Standard desktop towers, potentially SFF (Small Form Factor) models.
- Pros: Most Powerful (Potentially); Easily Upgradeable (RAM/Storage); Standard x86; Potentially Free.
- Cons: Highest Power Consumption; Bulkiest & Noisiest; No Battery Backup.
- Leveraging: Raw power; easy to add SATA or NVME SSD or more RAM.
- POC Suitability: Very capable for Docker, K3s clusters , complex apps. SSD upgrade is almost essential for good experience.
- Similar to laptops, the basic desktop form factor is generally well understood. Resources for specific tasks like component upgrades or OS installation can be easily found online if required.
Option 4: Mini PCs
- Examples: Intel NUC (used/refurbished), Beelink, Minisforum, etc.
- Pros: Compact & Tidy; Good Performance/Watt; x86 Compatibility; Often Upgradeable (RAM/Storage – check model); Relatively Quiet.
- Cons: Upfront Cost (usually need to buy); Thermal Limits (potentially); External Power Brick.
- Availability/Cost: Prices range widely based on CPU generation, RAM, and included storage. Look for deals or slightly older models for better value. Refurbished units can be cost-effective.
- POC Suitability: Excellent, versatile platform. Comfortably handles Docker, multi-container apps, K3s (single or small multi-node). A great balance you can grow with. Often ship with NVMe SSDs.
- Numerous video reviews comparing Mini PC models suitable for home data center use are available on YouTube. Searching for specific brands like Beelink or Minisforum, or terms like ‘mini pc homelab’, is a good starting point if you want visual comparisons. Video Link to know more about Mini PC is below
Recommended Specs for Your POC (and Planning for Scale)
These guidelines are based on common homelab goals like running containers (Docker) and learning Kubernetes (K3s/K8s). Your specific software choices might adjust these, but aim for specs that ensure a smooth experience.
Solid POC Baseline (Good Starting Point):
- CPU: Quad-core (4 cores), 64-bit (x86_64 or ARM64)
- RAM: 8GB
- Storage: 128GB – 256GB SSD (SATA/NVMe preferred) or 128GB – 256GB eMMC.
- Why: This level comfortably runs Docker, multiple typical containers, and allows for initial single-node Kubernetes (like K3s) experimentation. While an SSD provides the best performance, onboard eMMC (if available) is a viable alternative to unreliable MicroSD cards.
Serious / Scalability Focus (If Budget Allows, Scaling Soon, or Experienced):
- CPU: 64-bit, aiming for 6-8+ powerful cores (typically x86_64 Hexa/Octa-core, but high-performance ARM64 is also suitable).
- RAM: 16GB – 32GB (or more)
- Storage: 256GB – 512GB+ NVMe SSD
- Why: Provides headroom for K8s master/worker nodes, hosting databases, or acting as a storage node. Recommended if scaling soon, experienced, or budget allows.
Key Notes:
- SSD remains the top recommendation for overall responsiveness.
- eMMC (128GB+) is acceptable for the baseline, offering better reliability than MicroSD but typically lower performance/capacity than SSDs. Availability at this capacity might be limited on budget devices.
- Avoid running server workloads long-term from MicroSD cards.
- ARM vs x86 for Serious Tier: Docker/K8s largely bridge the gap. Most common software has
arm64images. Verify for niche applications, but architecture is less of a barrier now. - Always check specific software requirements.
- Components meeting the ‘Serious’ tier represent a higher investment. Used server components might offer cost savings.
Making Your Choice & Thinking Ahead (Day 0 Decision):
Consider these factors for your plan:
- Availability & Budget: What do you have? What can you afford?
- POC Needs vs. Specs: Does chosen hardware meet recommendations for your POC?
- Power/Noise/Space: Tolerances and WAF limits.
- Future Upgrade Path: Remember SBC RAM limitations. Laptops/Desktops/Mini PCs often offer easier upgrades.
Essential Extras to Plan For (Budget/Shopping List):
Factor these potential needs into your Day 0 plan:
- For SBCs: Quality Power Supply, Boot Media (eMMC model, or MicroSD only for initial setup + USB SSD/NVMe SSD & adapter), Case, Ethernet Cable.
- For Laptops/Desktops/Mini PCs: Bootable USB Drive (for OS install, Linux recommended!), Ethernet Cable. Consider a SATA or NVME SSD if upgrading an old HDD.
- Optional (All Types): External USB SSD if internal storage is limited.
Looking Ahead: More Detail to Come
Note: This section provides a high-level overview to help you make informed decisions during your Day 0 planning. Fear not, I plan to cover specific hardware selection in much greater detail in a separate, dedicated post (or perhaps another series!). We’ll explore particular models of SBCs and Mini PCs readily available and popular , compare performance notes where possible, discuss sourcing strategies in more detail, and likely touch upon considerations for networking gear and dedicated storage solutions as your home data center grows. For today, the goal is to make a solid, informed choice for your initial POC based on the guidelines above.
Plan Now, Avoid Delays Later:
Choosing your hardware platform, verifying specs, and identifying necessary purchases now, during Day 0 planning, ensures you have everything ready when you actually start building on Day 1. It prevents frustrating delays because you forgot a crucial cable or don’t have a way to install the operating system.
The Operating System: Linux Power with a Friendly Start
Choosing the right Operating System (OS) is a foundational piece of your Day 0 plan. As you embark on building a home data center Proof of Concept (POC) designed to run modern server technologies like Docker and Kubernetes, the OS choice heavily influences your learning path and resource usage. While many options exist, Linux stands out as the standard and most effective platform for this journey.
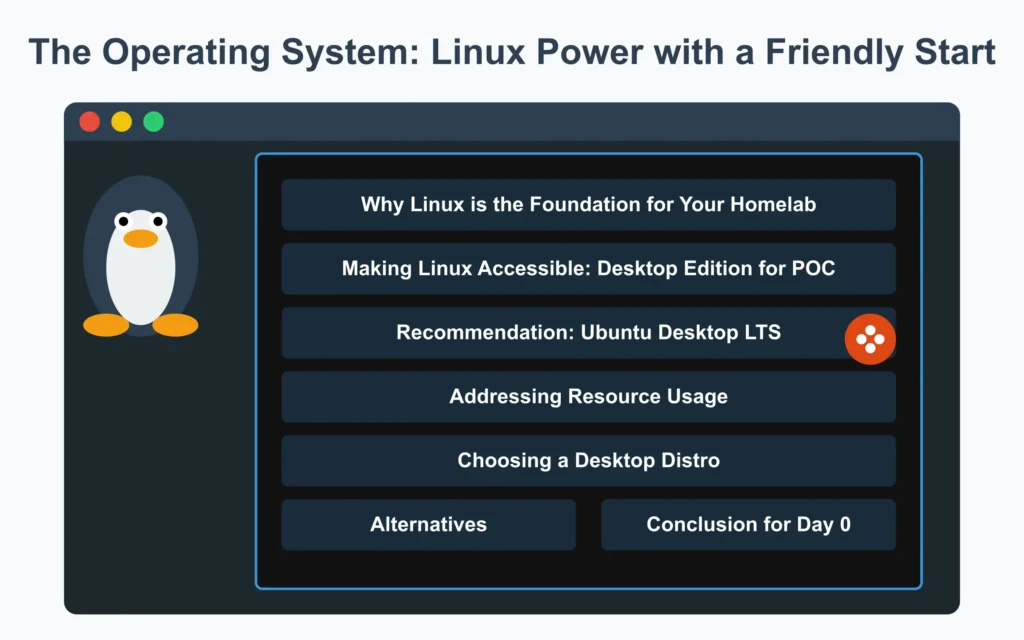
Why Linux is the Foundation for Your Home data center:
- The Native Home for Server Tech: Docker, Kubernetes, and the vast majority of server software, databases, and infrastructure tools are developed and run natively on Linux. Choosing Linux means you’re working directly in the environment these tools were designed for.
- Flexibility and Control: Linux offers immense flexibility and customization options. Learning to use its powerful command-line interface (CLI) – which is essential for server management – gives you precise control over your system.
- Cost-Effective: Linux distributions are typically Free and Open Source Software (FOSS), eliminating licensing costs from your initial budget.
- Strong Community Support: You gain access to a massive global community providing forums, documentation, tutorials, and troubleshooting help for almost any issue imaginable.
- Stability & Security: Linux is known for its stability, crucial for server tasks, and offers robust security features (when configured correctly).
Making Linux Accessible: Why a Desktop Edition for the POC?
While experienced administrators often prefer minimal, command-line-only “server” installations for efficiency, for your initial POC, especially if you are new to Linux, starting with a full Desktop Linux distribution is highly recommended. This approach prioritizes lowering the initial learning curve:
- Familiar Graphical Interface (GUI): A desktop environment provides visual navigation and controls similar to Windows or macOS, making your first interactions less intimidating.
- Simplified Initial Setup: Common tasks needed right after installation – connecting to Wi-Fi (if needed initially), managing basic system settings, or using a web browser to follow tutorials – are often easier with a GUI.
- Visual Aids & Integrated Tools: You get graphical tools like a file manager, text editor, system monitors, and crucially, an easy-to-launch Terminal application for when you start using command-line instructions.
- Focus on Core Technologies First: By using a familiar desktop environment, you can concentrate your initial efforts on understanding Docker basics or deploying your first application, using simple terminal commands without simultaneously battling headless server administration.
The Recommendation: Desktop Linux (e.g., Ubuntu Desktop LTS)
Based on the balance of Linux power and beginner-friendliness for this initial phase, the recommendation is to plan on installing a popular, user-friendly Desktop Linux distribution. Ubuntu Desktop LTS is an excellent choice due to its vast community support and extensive online resources.
Addressing Resource Usage:
It’s true that a desktop environment uses more RAM and CPU than a minimal server install. However, with the recommended baseline hardware (4+ cores, 8GB+ RAM, SSD/eMMC), this overhead is generally acceptable for the light workloads of an initial POC. The benefit of a gentler introduction often outweighs the resource cost at this stage. You can always optimize and potentially move to a headless setup in later iterations as your skills and needs evolve.
Choosing a Desktop Distro:
- Ubuntu Desktop LTS: Top recommendation for community support and tutorials. (LTS = Long Term Support).
- Linux Mint: Based on Ubuntu, often praised for its user-friendliness.
- Fedora Workstation: Offers newer software versions if you prefer a more cutting-edge experience.
- Raspberry Pi OS (with Desktop): The natural choice if using a Raspberry Pi.
Alternatives (Windows/macOS): Briefly, while useful for development on your workstation, these are not suitable choices for dedicating hardware to a Linux-centric server POC aimed at learning Docker and Kubernetes infrastructure.
Conclusion for Day 0:
Plan to start your homelab journey with the power and flexibility of Linux, but make your initial steps easier by choosing a user-friendly Desktop distribution like Ubuntu Desktop LTS. This approach provides a comfortable environment to begin learning essential concepts before diving deeper into command-line server management.
Moving Forward: Focusing on Ubuntu
Following on from the recommendation to start with a user-friendly Linux distribution, it’s important to note my approach for the rest of this series. While many excellent distributions exist (like Debian, Fedora, Mint, and others), moving forward from Day 1 onwards, the specific examples, commands, configuration snippets, and step-by-step tutorials will primarily feature Ubuntu.
The reason is simple: I have vast experience working within the Ubuntu ecosystem. By focusing on the distribution I know most intimately, I can provide the clearest, most accurate, and practical guidance as we navigate the setup and configuration process together. This ensures the instructions are well-tested and reliable based on real-world use.
While our Day 0 plan recommends starting with Ubuntu Desktop LTS for its initial ease of use, please be aware that many of the subsequent configurations and management tasks will heavily involve the command-line interface (CLI), accessed via the Terminal. The skills and commands shown will generally be applicable whether you are running the Desktop version or transition later to a minimal Ubuntu Server installation, preparing you for standard server administration practices.
If you choose to use another Debian-based distribution (like Debian itself or Linux Mint), you’ll find the vast majority of commands and procedures are identical or require only minor adjustments. If you opt for a distribution from a different family (like Fedora), the core concepts remain the same, but you will need to translate package management commands (e.g., dnf instead of apt) and be aware of potential differences in configuration file paths or default settings. The strong Ubuntu community support, both globally and often locally, is another advantage making it a practical choice for examples.
So, while you’re free to choose any Linux distribution you prefer, be prepared for the examples in future posts to be Ubuntu-centric.
Wrapping Up Day 0: Your Blueprint is Ready!

And that brings us to the end of Day 0! If you’ve followed along, you’ve moved beyond just dreaming about a home data center and taken the crucial first step: laying the strategic foundation. Day 0 wasn’t about plugging in cables or installing software; it was about deliberate planning, self-assessment, and creating a realistic blueprint for action.
By now, your own Day 0 Blueprint should be taking shape, ideally including:
- A clear, defined goal for your initial Small-Scale Proof of Concept (POC) (even if it’s the default WordPress suggestion!).
- Your chosen hardware platform (SBC, old laptop/desktop, or Mini PC) that meets the recommended specs for your POC baseline or future goals.
- An awareness of the storage strategy (SSD/eMMC preferred over MicroSD!) and any essential extras you might need to acquire.
- A decision on your starting Operating System (likely a beginner-friendly Linux Desktop like Ubuntu LTS).
- Defined success criteria and key learning objectives for your first hands-on iteration.
Remember, the core philosophy here is to start small, learn iteratively, and embrace the process. Your POC doesn’t need to be perfect; its primary purpose is to get you started, build foundational skills, and validate your initial approach before you invest more time or money. This planning phase, while perhaps less exciting than building, is what sets you up for a smoother, less frustrating journey ahead
Congratulations on completing the vital Day 0 planning! You’ve done the strategic thinking, and now you have a concrete plan to guide your first steps.
What’s Next? Day 1: Building the POC!
Stay tuned for the next post in the “Chronicles of a Home Data Center” series: Day 1. We’ll finally get hands-on, taking our Day 0 Blueprint and bringing the Small-Scale POC to life. Expect details on OS installation, setting up Docker, deploying our first containerized application based on the plan, and tackling the inevitable first hurdles.
Share Your Plans!
I’d love to hear about your own Day 0 planning in the comments below! What hardware are you leaning towards? What’s your first POC goal? Facing any specific challenges? Sharing experiences is a huge part of the homelab community (and the tech scene right here in Vietnam!). Don’t hesitate to ask questions – let’s learn together.
Make sure to follow along so you don’t miss Day 1! The real fun is about to begin.